Update the Firmware via Recovery Image
Installation instructions from version 4.0.0 upwards for firmware updates of the SMS Gateway
➯ Before you update your SMS Gateway check the page Known Bugs to reduce complications.
ê A new license managment got released with firmware version 3.0. Immediately after the installation it is not possible to send SMS before uploading the appropriate license file. Pay attention to the loss of all configuration data during a software update with the recovery image.
i If you don't know how to access the webinterface, you'll find an explanation on how to determine the IP-adress of the gateway here.
You then have to put the IP into the URL of your browser to access the webinterface.
Securable Data
❕ Necessary:
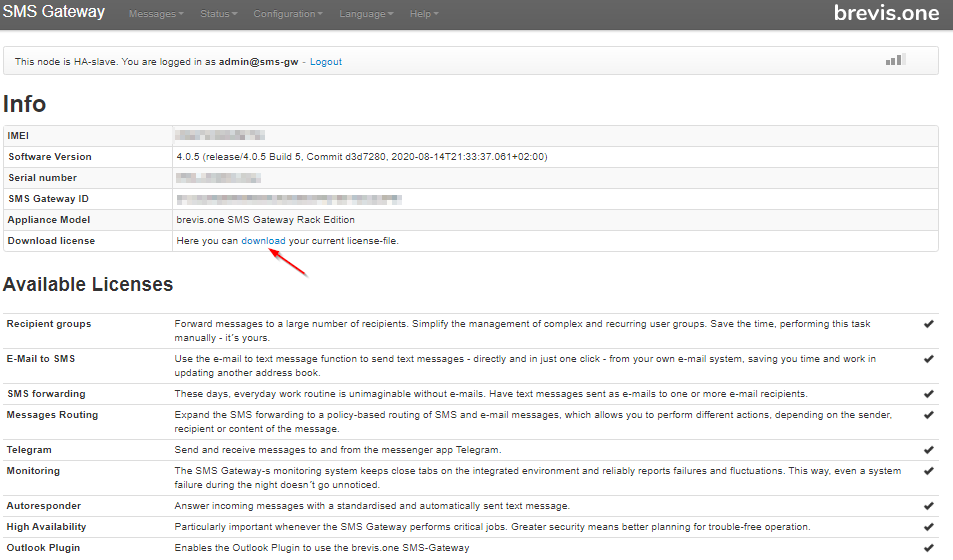
Download your current license file from the web interface ( under Help => Info ) of the SMS Gateway. ( From Version 3.0.5 on )
i Additional:
You can backup the following data for versions after 3.1.1:
- Import and Export of the addressbook
- Import and Export of the configuration for the modul Monitoring
From Version 4 on:
1 Download Image and create bootable USB Stick
1.1. Download the Recovery Image from my.brevis.one
i To download the Software you need your SMS Gateway serial number. The serial number is locate on the SMS Gateway and starts with "GW"
1.2. Download and install Linux Live USB Creator: http://www.linuxliveusb.com/
1.3. Start Linux Live USB Creator
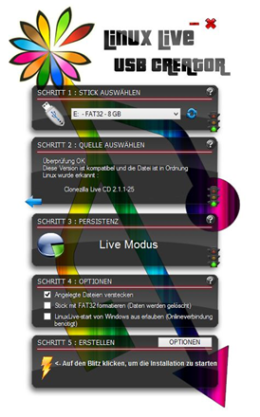
1.4. In step 1 select the correct USB Stick
1.5. In step 2 select the recovery image
1.6. Press the flash to start the copy process
1.7. After the flashing process the USB Stick is ready to update the SMS Gateway
2 Adjusting the boot sequence of the SMS Gateway (Rack Edition only)
2.1. Connect a monitor and keyboard to the Gateway
2.2. Reboot the Gateway to access the boot menu
2.3. After a short period of time the following message appears
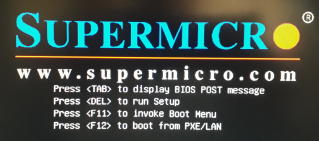
2.4. Press del once to access the boot menu (this takes some time)
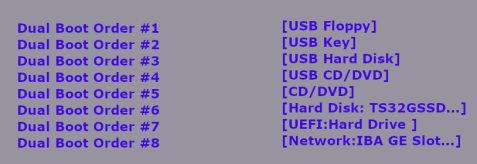
2.5. In the following window navigate using the arrow keys ← and → to the tab Boot and arrange the boot sequence as shown in the following picture
2.6. Switch to the tab Save & Exit using the arrow keys ← and → and confirm your changes with Save Changes and Reset
2.7. The Gateway restarts and your changes are saved. These changes can remain this way after the update.
3 Preparing the SMS Gateway
3.1. Turn on the SMS Gateway
3.2. Connect to the Gateway via the webinterface (only for Desktop Edition)
3.3 Connect the USB stick to a USB port on the Gateway
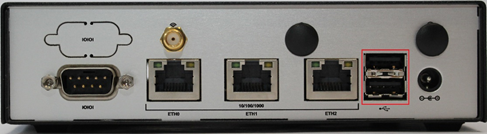
3.3.1. Bootable USB ports of the Desktop Edition
3.3.2. Bootable USB ports of the Rack Edition

4 Install the Recovery Image on the SMS Gateway (Desktop Edition)
ê It is possible that after the installation the IP of your SMS Gateway changes. This can be bypassed by setting your DHCP server to assign a static IP to your Gateway.
Even if the IP changes, you can easily find the new IP following the explanation here.
i If you want see the progress of the ongoing update, connect to the serial console, explained here. During the update you will get status informations through the output of the console.
4.1. Reboot the SMS Gateway via the webinterface: Configuration → Reboot/Shutdown → Reboot
4.2. The Gateway should now be inaccessible via the webinterface and the power LED should turn off and on again
4.3. The Installation now starts automatically
4.4 The Installation procedure takes approximately 30 minutes. We recommend not to fall below this recommendation
4.5 After successfully installing the recovery image, the IP address can be determined in the following way: How do i find the IP adress of my SMS Gateway?
5 Install the Recovery Image on the SMS Gateway (Rack Edition)
ê It is possible that after the installation the IP of your SMS Gateway changes. This can be bypassed by setting your DHCP server to assign a static IP to your Gateway.
Even if the IP changes, you can easily find the new IP following the explanation here.
i If you want see the progress of the ongoing update, connect to the serial console, explained here. During the update you will get status informations through the output of the console.
5.1. Reboot the SMS Gateway by pressing the On/Off button for approximately 5 seconds until the power LED turns off
5.2. Turn on the Gateway by pressing the On/Off button one time. The power LED turns on again
5.3. The Gateway should now be inaccessible via the webinterface
5.4. The Installation now starts automatically
5.5 The Installation procedure takes approximately 30 minutes. We recommend not to fall below this recommendation
5.6 After successfully installing the recovery image, the IP address can be determined in the following way: How do i find the IP adress of my SMS Gateway?
6 Finishing the installation
ê After completing the installation it is not possible to access the webinterface via HTTP anymore. The access is now done via HTTPS and could potentially lead to the following message: "This is not a safe connection". Further details you will find here:
6.1. Disconnect the Gateway from power after waiting for the recommended time
6.2. Disconnect the USB stick
6.3. Power up the SMS Gateway
6.4. If the webinterface is not accessible at this point, the IP has changed
6.4.1. To regain access you have to reobtain the IP of the Gateway (How do i find the IP adress of my SMS Gateway?)
6.5. The default login data is as follows: user: admin password: admin
Related articles